.png)
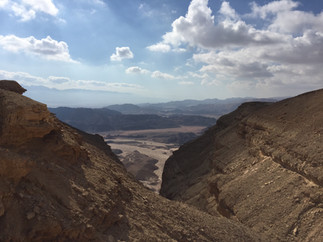
Trekking through the Timna Valley may be one of the greatest desert trekking adventures that Israel has to offer. The Timna Valley is a half-crater (geological), and in the very middle of the valley the Timna Mountain stands tall, mysterious and dark (it’s all made of Granite stone!). The valley itself is filled with beautifully coloured sandstone; making great canyons, pillars and different rock formations of all shapes and colours. The geological background of Timna holds a historic milestone: 7,000 years ago, someone stumbled across the copper turquoise sandstone rocks scattered across the Timna Valley, and for the first time in history the ancient people of the chalcolithic period built a furnace and made copper metal
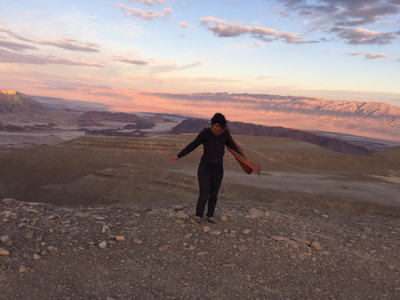
This trek holds so much inside it – a rich and full history (all told by the archaeological artifacts in the valley) of the first signs of copper metal, beautifully coloured sandstones, a lone mysterious mountain, hanging cliffs around the valley, sand dunes, desert flora and fauna and crazy red sunsets overlooking the Edom Mountains, standing across from us beyond the rift valley in Jordan. A truly mesmerizing and breath-taking trek, I enjoyed every colourful minute of this Valley.

The Timna Valley trek is a 2.5-day loop trek, totally accessible by public transportation and very easy to follow the trails. The first half day starts at the visitors’ centre of Timna, from there the trail will lead you to the first campsite that is situated underneath a great red sand dune (perfect for watching the sunset!). The second day will lead you up the cliffs surrounding the Timna Valley, where you will have terrific views of the valley, Timna mountain, and the Edom mountains across the rift valley. The third and last day will lead you back down the to the valley where you’ll meet different sandstone rock formations (including the Shlomo pillars!), sandstone canyons, sand dunes, and for a great finale – the great Timna Mountain. The trail from the mountain will lead you down a dry riverbed straight back to where you started at the visitors’ centre!
Days: 2.5
Kilometres: 37
Best Season: Autumn to Spring (November to March)
Difficulty Level: Difficult
Geographical Area in Israel: The Eilat Mountains

The important details you need to know in order to hike this trek:
Detailed map link
Seasons for Trekking
This trek is suitable (weather wise) from November to March. You should be aware that the Eilat Mountains can get really hot, even during the winter time. The best possible months to be trekking here is January to March. During October or April, you may encounter heat waves. Be aware that flash floods can occur in this area during this season so make sure to check the weather report before you head out. Do not attempt to hike this trek during heavy rain. Check out seasons in Israel for more information.

Transportation
This trek is accessible by public transportation, but it does add an extra 3 km road walking to the start of your trail in Timna. You can take any bus that will take you to Eilat, from Jerusalem/Tel Aviv/Be’er Sheva/Haifa. Just get off at the Elifaz Branching. From there you can walk or hitchhike to the entrance of Timna, right across from the visitor’s centre you’ll find the red trail mark for the beginning (and ending) of the trek. For the bus schedule and bus information here. The buses to Eilat are sometimes full, you might want to order a bus ticket ahead of time. This trek is a loop trek, so you can just head back to the main road (route 90) and catch a bus from there to Eilat or to one of the main cities mentioned above.
For more on trekking in Israel using public transportation here.
By car – you can park your car at the beginning of the trek, at the visitor’s centre. You may have to pay the park fees in order to park there. Another option is to park your car along the road leading to Timna, or even in the entrance to Elifaz, the small village near Timna. If you have a sturdy car, and you’re willing to risk driving along a dirt path, you can follow the black trail marked here and park at the Mangan Campground (this is what I did).
Timna Park fees
Technically, if you’re hiking in Timna by foot and you do not enter by car at any point, you don’t have to pay the fee. The Israeli National trail passes through the park and the hikers on the trail do not pay the entrance fee. I tried contacting the park for more specific guidelines regarding the fees but they weren't responsive. If you are interested in entering by car, or parking your car inside the park the entrance fee (by car) is 45 nis per person (if you pay ahead of time through their website). Their website is not very English-friendly, but here’s a link to their website in any case: https://www.parktimna.co.il/en/
Water Supply
You may find some pools along the trek in different river beds, but it is not advisable in Israel to drink from springs and pools. This is due to the fact that people swim in them, they may be contaminated by different animals and sometimes by factories that are far from the eye but can contaminate the water. When you trek in the desert, first of all use your water wisely. You should be carrying at least 4.5 litres per person per full day of trekking (6 if the weather is hot). Keep in mind that you need water for the campsites, for cooking and drinking during the night. That can be pretty heavy if you’re carrying water for more than two days.
On this trek you’ll need to carry at least 9 litres. If that’s too heavy for you, you can arrange water caches at your campsite. This can either be done by yourself via a four-by-four vehicle and a few days ahead of your trek or by someone with a jeep who can do this for you for a fee (It depends on where the cache is, but it can cost around 100 nis per person per night). If you’re planning on cooking by campfire, you should also arrange some fire wood, since burning any local vegetation is forbidden.
If, like me, you don’t own or rent a four-by-four vehicle, I recommend paying someone to do your water caches, they can also bring you fire wood at an extra fee. There are a few people who do this in the desert area. I recommend contacting Yanir Bamidbar. You can check out Yanir's website for more info.
Food
You’ll have to carry your food with you for the two days. You can buy everything you need in Be’er Sheva or Eilat.
Precautions and Dangers
1. Flash floods - The desert area in Israel is prone to flash floods. The lack of vegetation in the desert and the type of soil makes it hard for water to seep down. When there is enough rain in the desert, it flows on top of the surfaces to the lowest places- river beds. Most of the riverbeds in the desert are dry all year round, except for a few days when it rains. The rivers then come to life, and it is very dangerous to be hiking in a riverbed during a flash flood. In some areas it can be raining even a few kilometres upriver from where you are and the flash flood will come out of nowhere, splashing down the riverbed and taking everything, it can with it. The tricky part about flash foods is that the riverbed does not flood gradually, it comes at you at lightning speed. Precautions for flash floods:
a. Check the weather in the destinated hiking area before you leave.
b. Do not attempt to hike if there is a rainy weather report.
c. If you do find yourself in the desert during heavy rain, make sure to get out of any riverbed near you, climb to the highest, safest point you can get to and contact someone for help. If there are flash floods around you, it can keep flowing for hours and even days, contact someone to get you out of there safely.
2. Heat stroke- It can get hot during the day in the desert, even in freezing January. The days are hot and the nights are cold. Make sure to always wear a sun hat, take long breaks in the shade and refreshen yourself in pools and springs along the way.
3. Dehydration- The desert can get really hot, and it is usually very dry. Even during the winter season, remember to drink a lot. Do not take less than 4.5 litres of water with you per day per person. You should wear sunglasses, a hat and a long-sleeved shirt. If you’re feeling dizzy, nauseous or/and have a headache, you’re probably dehydrated. Find a shade to rest and drink your water slowly and gradually.
4. Animals- There aren’t any big dangerous animals in the desert. Beware of snakes and scorpions, especially during the spring time and around your campsite. In the morning shake your boots before you put them on and beware when you pick up rocks.
7. Nature reserves- The whole trek inside the amazing nature reserve of the Eilat Mountains. Make sure you know the basic guidelines fore trekking in nature reserves.
If you find yourself in an emergency situation, you can call for help. Call 100 for the police and they can connect you with the regional rescue team. You can also call 101 for medical assistance. The direct number for the rescue team in the Eilat region is 050-6276442.
Trail Description
Day 1 (2.5 km/4.5 km)
The first day is a really short day, this is because I assume that you will arrive here sometime near noon, if you’re coming from Jerusalem or Tel Aviv. If you can start first thing in the morning on your first day, you can combine this half day with the next day.
If you’re arriving by bus, you’ll half to walk from the bus station on route 90 to the visitors’ centre, along the asphalt road leading to the Timna Valley Park, about a 2.5 km hike. You may be able to hitchhike along this route if you prefer.
From the visitors’ centre, look for a red marked trail heading north, it’ll be a bit before you reach that actual building. Check out trail marks in Israel for more information.
Once you’re on the red trail, you’ll hike approximately 2 km along scenery that will make you feel like you’re on the moon or mars!
The camp site is called Wadi Mangan campsite, it’s like any other desert campsite- just a sign and maybe some old bonfire pits. Right across from the campsite you’ll see the Mangan red sand dune – definitely a great place to enjoy your first incredible sunset in the Timna Valley. The beauty of the sunsets here are reversed; you want to face the Edom Mountains to the east, and not look toward the actual sunset on the west, trust me on this one!

Day 2 (14 km)
From your campsite look for the red trail mark (the campsite sits right on the junction of the red and black trail marks). You’ll be following this red trail mark for most of the day, at first heading north and then west and south. The day starts with a pretty long and arduous climb, about 400 meters along 4 km.

Once you’ve gained some altitude, you’ll start seeing some incredible views of the valley below you. The Timna Valley is a half geological crater, so where is its other half? 15-20 million years ago the East African rift valley started opening up, and the Arava valley (route 90 runs along the Arava) is part of this rift. The other half of the Timna crater is called Punon and is located 105 km north of Timna, right on the other side of the rift valley (in Jordon). During historical times Punon was a major centre for copper mining, Timna was always a close second.


Once you’re high on the cliffs overlooking the valley, you’ll start hiking west along these cliffs for about 3 km. After 3 km you’ll meet a junction with a blue marked trail heading north. Keep following the red trail marks After another 4 km and some more ascending (approximately 250 meters), you’ll reach Mt Berech (Knee Mountain). This Mountain used to be an army base for some time and is now completely abandoned. It may be a little creepy wandering around the base, but the mountain does offer a magnificent view of the Timna Valley, from the west, which is pretty rare.

From Mt Berech descend along the red trail for another kilometre and a half until you reach the dry river bed called Botem and the Botem campsite. This campsite is pretty isolated, clean and offers bonfire pits and some walls that can protect you from strong winds. You'll find some pics below from the sunset we witnessed, maybe one of the most beautiful sunsets I've ever seen. Make sure to climb to a small hill around the campsite in order to actually see the Edom Mountains during the sunset!!


Day 3 (19 km)
This is the longest and hardest day, but probably the most rewarding also. The trails colours will change a lot during the day, and some of the trails aren’t always marked accurately, I tried contacting the Timna Valley Park about this, but to no avail. This doesn’t make it a difficult day to navigate through, you just have to be really attentive to the map, and it may be a good idea to hike this day with a hiking map app ready. Most of the park is not a nature reserve, so technically you can wander off trails, but they do have signs saying that while hiking stick to the marked trails. On the other hand none of the maps offer the latest updated trails.
The day begins with an easy hike along the levelled heights surrounding the Timna valley. After 2.8 km, you’ll meet a junction with a black trail mark, you should follow the black trail heading east. After 1 km along the black trail, the path will start to descend abruptly. The next 850-meter hike will be a hard, knee breaking, 355-meter descent. At the end of it – you’ve officially arrived inside the very heart of the Timna Valley!


*I’ll recommend from here on out the trail that I followed that involved missing out on some of the Timna sites (like the ancient mines and the arches), if you want a longer day, you can easily add them to this hiking day. *

Once you’re down in the valley, you’ll meet a trail junction, follow the black trail for 500 metres and then the blue trail for 600 metres. You’ll then meet a junction with a red trail. Keep following the blue trail for the next 2.5 km. Along the blue trail you’ll meet a red sand dune, the “white canyon”, the “pink canyon”, and sightings of some copper sandstone.

After the 2.5 km on the blue trail, you’ll meet a junction, follow the black trail heading east, parallel to an asphalt road leading to the “mushroom” (a rock formation). After 1 km on the black trail (and 100 meters on the asphalt road), you’ll arrive at the mushroom (a main attraction for the park). Enjoy the different archaeological sites and the cool mushroom formation.
From the mushroom, on the map you’ll see a green trail that leads you to the asphalt road heading to the Shlomo pillars. When I got there I saw a black trail mark that forks west after 300 metres, leaving you with no trail. I couldn’t find a more updated map, so I just used my Israel hiking map app to navigate to the road, along what should have been a green marked trail. It’s not a big deal, just 400 meters of hiking trailless.
Once you meet the road, cross it and look for the bicycle path that’s marked on the map but with no colours. It’s really clear and easy to see.

Follow the bicycle path for 1.3 km, until you reach the Shlomo pillars. Here you should walk up the steps, see the view and check out the very cool Egyptian temple.
From the pillars you’ll see a blue trail (that’s not marked on any map) heading west, follow this trail until you reach the Timna Action area (where you can fill up water if you need to). From there take a green trail (also not marked on any map) heading west until it reaches the INT trail. From the Shlomo pillars to the INT it’s about 700 metres.

Follow the INT trail gradually ascending north. You’ve now started your very exciting ascent to the Timna Mountain (a 200-metre ascent). You’ll be walking at first along a dry river bed with crazy sandstone colours which quickly change to darker Granite colours.

The mountain peak will offer you a 360-degrees, panoramic view of everything surrounding the Timna Valley. A truly incredible, breath-taking experience.


From the Mountain you’ll start a cool descent down to the visitors’ centre along a dry riverbed. If you’re lucky and you arrive right after some flash floods, you may encounter a very refreshing pool towards the end of your trek!

From the visitors’ centre you can hitchhike or walk to route 90, or follow day 1 if you left your car at the Mangan Campsite.
Hope you enjoyed the trek; I would love to hear your thoughts about it! Contact me here! or comment below.
*Disclaimer*
It is the responsibility of the users of this website to be prepared for all possible conditions while trekking in Israel. Beware that conditions of trails may change day to day and season to season. All users of this website and its information assume full responsibility for their actions and judgments while trekking. The owner and authors of this site disclaims all liability including that of accident, loss, injury, or any other damage that may be sustained by anyone using the information contained on this website.