.png)
It’s the end of November and the desert has started beckoning me. The vast spaces have been almost out of bounds for the past few months because of the heat and lack of shade (and corona lockdowns), but now the days are very pleasant, the sky scattered with clouds and the air flows freely. The nights are cold but not yet freezing. I wanted a trek that would take me up to the high lands of the Negev desert, where I’ll be able to feel the infinity of the world, and this trek was perfect for it.

The trek is located in the south western tip of the Ramon crater, it takes us up high to Mt. Ramon (the highest peak in the Negev highlands- 1,033 metres!), along the cliffs of the Ramon crater and up to Mt. Iddo, where we can spot Mt. Arif – a beautiful mountain that overlooks the two hidden craters of the Negev desert. On our second day we’ll lose ourselves in the incredible stream bed of Wadi Eliav. The Wadi is so high (altitude wise) that it provides a habitat fit for trees that usually do not reach the desert area – almond trees (very bitter but edible!), beautiful Atlantic terebinth trees, buckthorn bushes and much more.

Trek Summary
Days: 2
Kilometres: 31
Best Season: Autumn to Spring
Difficulty Level: Difficult
Geographical Area in Israel: Western Negev Highlands
The important details you need to know in order to hike this trek:
Detailed map link
Seasons for Trekking
The perfect time to hike this trek is during Febuary-March, then the whole area is in full bloom. It’s crazy how green the desert can get during these months. If these months aren’t an option, the trek is suitable (weather wise) from October to April. The trek is located in a military training area, so it is usually open for travelers only on the weekends. Be aware that flash floods do occur in this area during this season so make sure to check the weather report before you head out. Do not attempt to hike this trek during heavy rain. Make sure to check seasons in Israel for more information.
Transportation
Unfortunately, this trek is not accessible by public transportation on account of it being so isolated. The trek begins at the trail heading to Mt. Ramon. If you have a car, you can park it for the duration of the trek at Borot Lotz (The Lotz Cisterns)– a great campsite right across the road from the trail to Mt. Ramon. To get to Borot Lotz, about five kilometres north of Mitspe Ramon at “Haruhot Junction”, take a right to Route 171, drive straight for about half an hour until you reach the dirt track to Borot Lutz. Follow the dirt track to the campsite and park your car (it’s fairly safe to leave it here).
If you don’t have a car, you can reach Mitspe Ramon (the nearest town, which sits on the cliffs of the Ramon crater) by bus from Be’er Sheva (there are hourly buses to and from Mitspe Ramon, for the bus schedule here). From Mitspe Ramon you’ll need to get a ride to Borot Lotz, this should cost about 350 nis. You could try and hitchhike to Borot Lots from the “Haruot Junction”, but it could take a lot of time since route 171 leads to Borot Lotz (for hikers and travelers), to some army bases and to route 10 (which is closed to civilians for most of the year). If you’re looking for a ride, I’d recommend contacting Yanir Bamidbar (who also does the water caches). You can check out Yanir's website for more information and orders. The trek is a loop trek so you’ll need to get a ride back to Mitspe Ramon at the end of the trek.


Water Supply
You may find some pools along the trek in different river beds, but it is not advisable in Israel to drink from springs and pools. This is due to the fact that people swim in them, they may be contaminated by different animals and sometimes by factories that are far from the eye but can contaminate the springs and pools. When you trek in the desert, first of all use your water wisely. You should be carrying at least 4.5 litres per person per full day of trekking (6 if the weather is hot). Keep in mind that you need water for the campsites, for cooking and drinking during the night. That can be pretty heavy if you’re carrying water for more than two days.
On this trek you’ll need to carry at least 9 litres. If that’s too heavy for you, you can arrange water caches at your campsite. This can either be done by yourself via a four by four vehicle and a few days ahead of your trek or by someone with a jeep who can do this for you for a fee (It depends on where the cache is, but it can cost around 100 nis per person per night). If you’re planning on cooking by campfire, you should also arrange some fire wood, since burning any local vegetation is forbidden.
If, like me, you don’t own or rent a four by four vehicle, I recommend paying someone to do your water caches, they can also bring you fire wood at an extra fee. There are a few people who do this in the desert area. I recommend contacting Yanir Bamidbar. You can check out Yanir's website for more info. You can also contact Yanir for transportation to Borot Lotz and back to Mitspe Ramon.

Food
You’ll have to carry your food with you for the two days. You can buy everything you need in Mizpe Ramon at the Super market.

Precautions and Dangers
1. Military training area- Most of the trek is located in a military training area and firing zone. It’s a highly active area, so do not attempt to hike this trek without coordination with the army. The area usually opens up during weekends. You can call this number in order to coordinate with them: 08-9902928. They might ask for the trail numbers, you can find them on the map at the "Israel Hiking Map" link above. For example, the trail number for Mt. Lotz to Wadi Eliav is 18371. For more on trekking in military training areas here.
2. Flash floods - The desert area in Israel is prone to flash floods. The lack of vegetation in the desert and the type of soil make it hard for water to seep down. When there is enough rain in the desert, it flows on top of the surfaces to the lowest places- river beds. Most of the riverbeds in the desert are dry all year round, except for a few days when it rains. The rivers then come to life, and it is very dangerous to be hiking in a riverbed during a flash flood. In some areas it can be raining even a few kilometres upriver from where you are and the flash flood will come out of nowhere, splashing down the riverbed and taking everything it can with it. The tricky part about flash foods is that the riverbed does not flood gradually, it comes at you at lightning speed. Precautions for flash floods:
a. Check the weather in the destinated hiking area before you leave.
b. Do not attempt to hike if there is a rainy weather report.
c. If you do find yourself in the desert during heavy rain, make sure to get out of any riverbed near you, climb to the highest, safest point you can get to and contact someone for help. If there are flash floods around you, it can keep flowing for hours and even days, contact someone to get you out of there safely.
3. Heat stroke- It can get hot during the day in the desert, even in freezing January. The days are hot and the nights are cold. Make sure to always wear a sun hat, take long breaks in the shade and refreshen yourself in pools and springs along the way.
4. Dehydration- The desert can get really hot, and it is usually very dry. Even during the winter season, remember to drink a lot. Do not take less than 4.5 litres of water with you per day per person. You should wear sunglasses, a hat and a long-sleeved shirt. If you’re feeling dizzy, nauseous or/and have a headache, you’re probably dehydrated. Find a shade to rest and drink your water slowly and gradually.
5. Animals- There aren’t any big dangerous animals in the desert. Beware of snakes and scorpions, especially during the spring time and around your campsite. In the morning shake your boots before you put them on and beware when you pick up rocks.
6. Cell phone reception- The campsite and most of the trails do not have cell phone reception. But in most of the area, if you try ascending to the hills and peaks surrounding you, you can usually find cell reception. If you feel you need more reassurance you can rent a satellite phone from a few companies in Israel. I recommend “Small World”. You can contact them at this e-mail - info@small-world.us
7. Nature reserves- a lot of the trek passes through some amazing nature reserves. Make sure you know the basic guidelines to hiking in nature reserves in Israel. Make sure to check how to trek in nature reserves.
If you find yourself in an emergency situation, you can call for help. Call 100 for the police and they can connect you with the regional rescue team. You can also call 101 for medical assistance. The direct number for the rescue team in the Negev region is 050-6276619.

Trail Description
Day 1
After you’ve parked your car at Borot Lotz, take the red and green trail marks, that are parallel to the blue trail you followed to the parking spot that take you back to route 171. Check out trail marks in Israel for more information. Walk for about 500 metres along the route towards the red trail mark that leads to Mt. Ramon (if you paid for a ride just get off here).
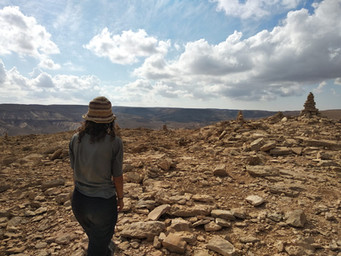
Take the red trail and then black that ascends to Mt. Ramon, the highest peak in the Negev region, reaching 1033 metres. At the peak you’ll enjoy an incredible view of the western most tip of the Ramon Crater (craters in Israel are geological craters, meaning they were formed by millions of years of different geological processes).

You’ll notice a few rock mounds and one long line of rocks that look man made. These are archaeological finds, all part of the mysterious K line – a line built by rocks that passes through the two highest peaks in the area (about 5 kilometres), archaeologists claim that it is part of a religious ancient ritual and dated back to 5,000 years ago.

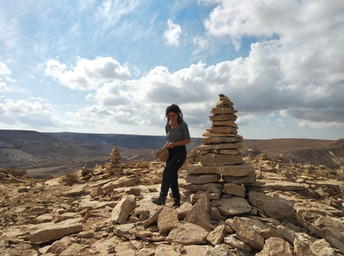
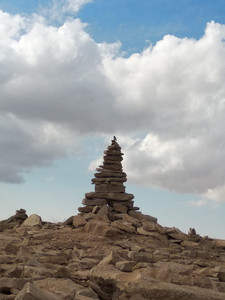
From Mt. Ramon follow the purple trail (The Negev Highlands trail) that orbits the tip of the Ramon Crater until it meets the red trail. Take the red trail that heads south and ascends to the ridge of Mt. Iddo. At the ridge, just follow the short green trail leading to the peak. Mt. Iddo overlooks the Ramon Crater from the southwest and the peak is filled with Rujum – an Arabic word meaning rocks piled up on top of eachother. Rujums used to be the way to show different paths that lead to water or home. You can also find huge Rujums on top of ancient graves scattered across Israel. The Rujums on Mt. Iddo are made by travellers wanting to leave something behind.


From Mt. Iddo go back on the green trail to the ridge and follow the red trail down to Nahal (river) Arod where you’ll find the blue trail. Head west on the blue trail for about 500 metres until you meet the Mt. Iddo campsite.
This day is fairly easy and even short, it took us about 4 hours from Mt. Ramon to the campsite. If you’re looking to make the day a bit more challenging, at Mt. Ramon you can follow the red trail that takes you east and down into the Ramon crater and then climbs back up to Mt Iddo on the other side. This can be a great option because you’ll get to feel the Ramon Crater under your hiking boots, and you'll enjoy a different viewpoint of the crater.

Day 2
After a night full of stars (and probably a cold night too), follow the blue four by four vehicle trail going west, until you meet the black trail that takes you up a river bed. For the next three kilometres follow the black trail that ascends along the riverbed. As you gradually ascend you’ll find that the riverbed gets more narrow and you’ll be climbing big rocks and boulders that are scattered along the trail.

Notice also how the plants change along the way, towards the end of the river you’ll find your first small almond tree of this trek. The black trail will at some point take you to a mountain ridge and you’ll find yourself at an impressive observation point, called Mt. Lotz. From here you’ll feel that infinite feeling that the desert offers you. You'll see desert mountain ranges as far as the eye can see (and if the air is clear -look west- you might even spot the Jordanian Edom Mountains). You can find Mt. Arif standing in the distance (its cliffs drop south into two small hidden craters). I love this place because it gives you the feeling of being on top of the world and at the same time you feel small standing here in front of this vast open desert.

From Mt. Lotz head southwest on the green trail that leads to the Eliav river bed. You’ll be descending along the riverbed that turns north west. This river is incredible. If you’re here during Febuary – March, get ready to see some crazy wildflowers and the desert in full bloom. But even if you’re here before the big bloom, you’ll be amazed by the trees. Huge almond trees and Atlantic terebinth trees every few metres, and scattered between them buckthorn bushes (that hold edible fruit in the late summer). They’re inconceivably big and it’s unbelievable how they manage to grow here in this desert (with less than 200 m”m of rain a year!). Most botanists argue that these trees are a relic species, that they are here because this area used to hold a more moderate climate.

After about 4 kilometres you’ll meet a trail junction, here you can choose between the black trail which will take you quickly to the finish line of the trek. If it’s still early in the day, I’d recommend to continue on the green trail that leads you through more incredible trees in the Eliav riverbed. Either way, you’ll meet the red vehicle trail that will take you north to the blue vehicle trail. You should head west on the blue trail until you meet route 171. If you came by car you can just follow the blue trail or the purple trail back to Borot Lotz.
Hope you enjoyed the trek, I would love to hear your thoughts about it! Contact me here! or comment below.
*Disclaimer*
It is the responsibility of the users of this website to be prepared for all possible conditions while trekking in Israel. Beware that conditions of trails may change day to day and season to season. All users of this website and its information assume full responsibility for their actions and judgments while trekking. The owner and authors of this site disclaims all liability including that of accident, loss, injury, or any other damage that may be sustained by anyone using the information contained on this website.